
Introduction
As a treasury professional, you’re likely juggling multiple payment approvals daily – from vendor payments (if performed by Treasury department) to intercompany transfers, payroll authorizations to tax remittances (if applicable, of course). Without direct bank API connections or SWIFT integration, this process typically involves downloading payment files from your system, manually uploading approved files to your banking portal and collecting approvals through emails.
This guide will walk you through creating your own Treasury Bot to automate this cumbersome process—without writing a single line of code or involving your IT department. By the end, you’ll have a working system that:
- Extracts payment data from multiple sources (ERP exports, Excel files, emails)
- Routes payments to appropriate approvers based on predefined rules
- Tracks approval status in real-time
- Creates bank-ready payment files
- Maintains a complete audit trail
- Sends notifications at each stage of the process
Let’s get started.
Part 1: System Architecture and Requirements
1.1 Understanding the Payment Approval Workflow
Before building our Treasury Bot, let’s clarify the payment approval process we’re automating in this scenario:
- Payment Initiation: Payments are initiated from various sources (ERP, AP system, or manually)
- Payment Extraction: Treasury team extracts payment details into standardized formats.
- Approval Routing: Payments are sent to appropriate approvers based on rules (amount thresholds, payment types, entities)
- Approval Collection: Approvers review and approve/reject payments
- Payment File Creation: Approved payments are consolidated into bank-compatible files
- Upload to Bank: Files are manually uploaded to banking portals & signed by authorized people.
- Confirmation: Payment execution is confirmed and recorded
1.2 Common Pain Points
- Manual Data Handling: Copying data between systems leads to errors
- Approval Bottlenecks: Tracking down approvers delays payments
- Limited Visibility: No centralized view of payment status
- Audit Challenges: Documenting who approved what and when
- Security Concerns: Email-based approvals lack proper controls
1.3 System Components
Our Treasury Bot will consist of these interconnected components:
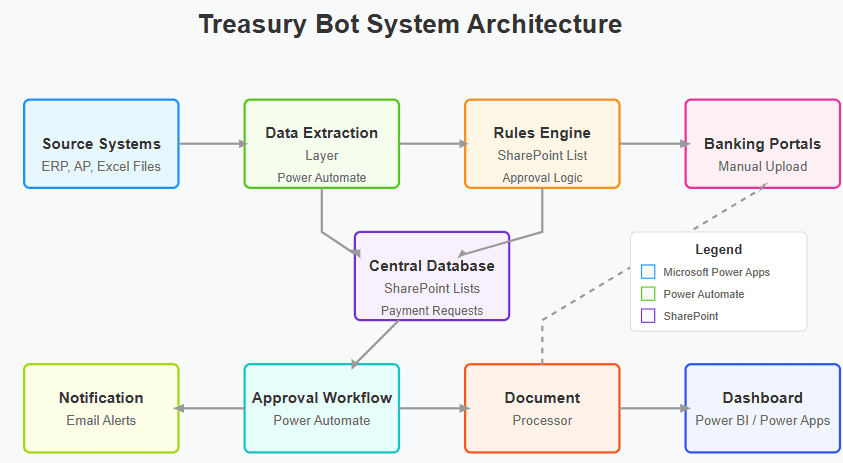
- Data Extraction Layer: Captures payment information from source systems
- Rules Engine: Determines approval workflows based on payment attributes
- Approval Workflow Manager: Routes payments to appropriate approvers
- Notification System: Sends alerts to relevant stakeholders
- Document Processor: Creates bank-ready payment files
- Audit Trail: Records all actions and approvals
- Dashboard: Provides real-time status overview
1.4 Technical Requirements
To build this system without coding, you’ll need:
- Microsoft Power Automate: For workflow automation
- Microsoft Power Apps (optional): For custom interface creation – nice, but not necessarily
- SharePoint: For document storage and approval tracking
- Microsoft Forms: For approval interfaces
- Power BI (optional): For advanced reporting
- Microsoft 365 Business license: Includes all the above tools
If your organization doesn’t use Microsoft products, alternative options include:
- Zapier + Airtable + Jotform
- Integromat (Make) + Google Workspace + Google Forms
For this guide, we’ll use the Microsoft toolset as it’s commonly available in corporate environments.
1.5 Preparing Your Environment
Before implementation, ensure you have:
- Appropriate Microsoft 365 licenses (Business Premium or higher recommended)
- Basic rights to create Power Apps and Power Automate flows
- Permissions to create SharePoint lists and libraries
- Exported sample payment files from your ERP/AP systems
- Documentation of your organization’s approval rules and thresholds
- Email addresses of all approvers and stakeholders
Part 2: Implementation Guide
2.1 Setting Up the Data Structure
First, we’ll create our data structure in SharePoint to store payment information and track approvals.
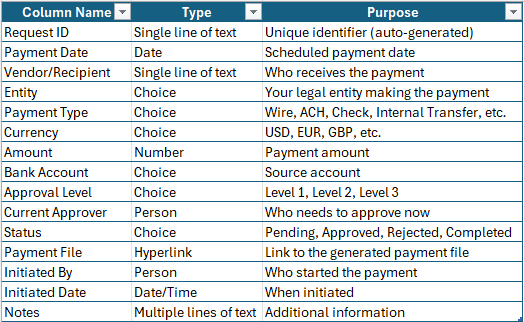
2.1.1 Create a Payment Requests SharePoint List
- Go to your SharePoint site and click + New > List
- Name it “Payment Requests” and add these columns:
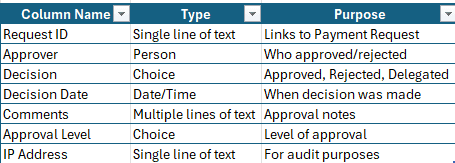
2.1.2 Create an Approval History SharePoint List
- Create another list named “Approval History” with these columns:
2.1.3 Create a Payment Templates Document Library
- Create a document library named “Payment Templates“
- Upload your bank’s payment file templates here (CSV, XML, etc.)
2.1.4 Create an Approval Rules SharePoint List
- Create a list named “Approval Rules” with these columns:
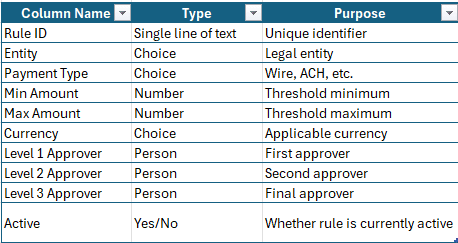
If you think it’s more practical, you can create only one sheet, combining the data from my tables. It’s up to you. The logic is the same.
2.2 Building the Payment Capture App
Now we’ll create a Power App to capture payment requests and initiate the approval process.
2.2.1 Create a New Canvas App
- Go to make.powerapps.com
- Click + Create > Canvas app from blank > Tablet layout
- Name it “Treasury Payment Requests”
2.2.2 Connect to Data Sources
- In the Power Apps editor, go to Data panel
- Click + Add data and connect to:
- Payment Requests list
- Approval History list
- Approval Rules list
- Users (Office 365 Users connector)
2.2.3 Design the Main Screen
Create a gallery view showing all payment requests with:
- Add a Gallery control showing Payment Requests
- Add filters for Status and Date Range
- Add a “New Payment” button
- Add “Import from Excel” button
2.2.4 Create the New Payment Form
- Add a new screen for payment entry
- Add form fields for all payment details
- Add validation (required fields, amount limits)
- Add “Submit” and “Cancel” buttons
2.2.5 Build the Excel Import Feature
- Add a screen for Excel import
- Add a file uploader component
- Add preview table to show parsed data
- Add “Import” and “Cancel” buttons
2.2.6 Create the Payment Detail View
- Add a screen to view payment details
- Show all payment information
- Add approval history section
- Add action buttons (Approve, Reject, Delegate) visible only to current approver
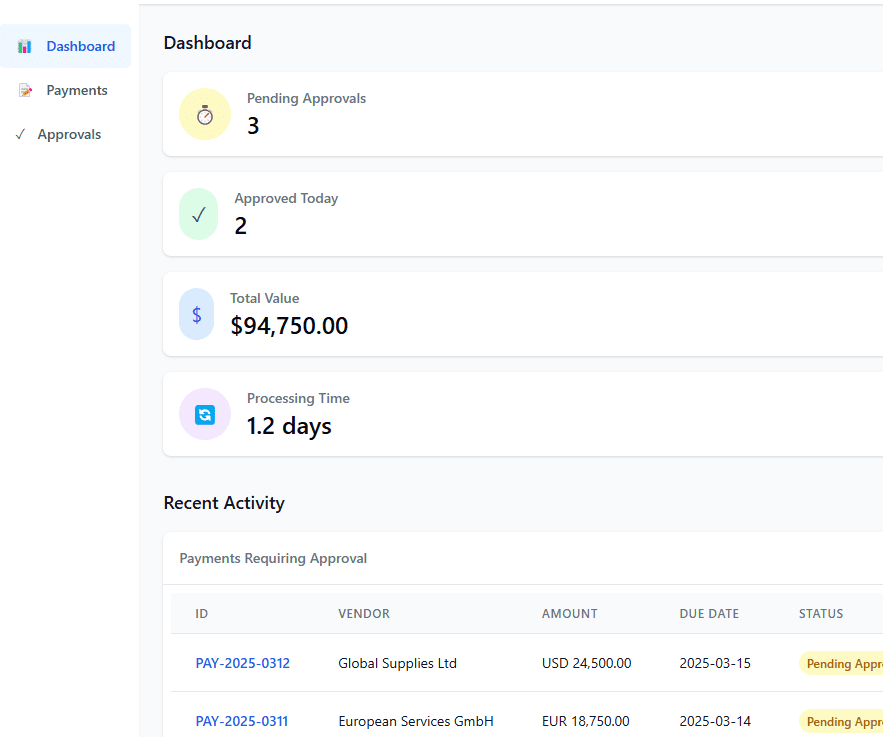
2.2.7 Build Dashboard Screen
- Create summary view of payments by status
- Show payments requiring user’s attention
- Show recent activity
2.3 Setting Up Approval Workflows in Power Automate
Now we’ll create the flows that power our approval process.
2.3.1 Create the “New Payment Request” Flow
- Go to flow.microsoft.com
- Create a new automated flow triggering when new item is created in Payment Requests list
- Add steps to:
- Read applicable approval rules based on payment attributes
- Determine required approvers
- Update the Payment Request with first approver and status
- Send notification email to first approver
- Create first entry in Approval History
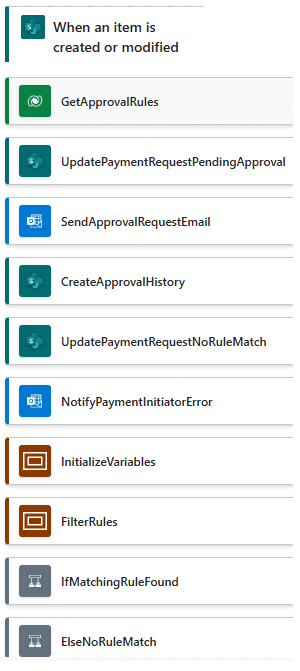
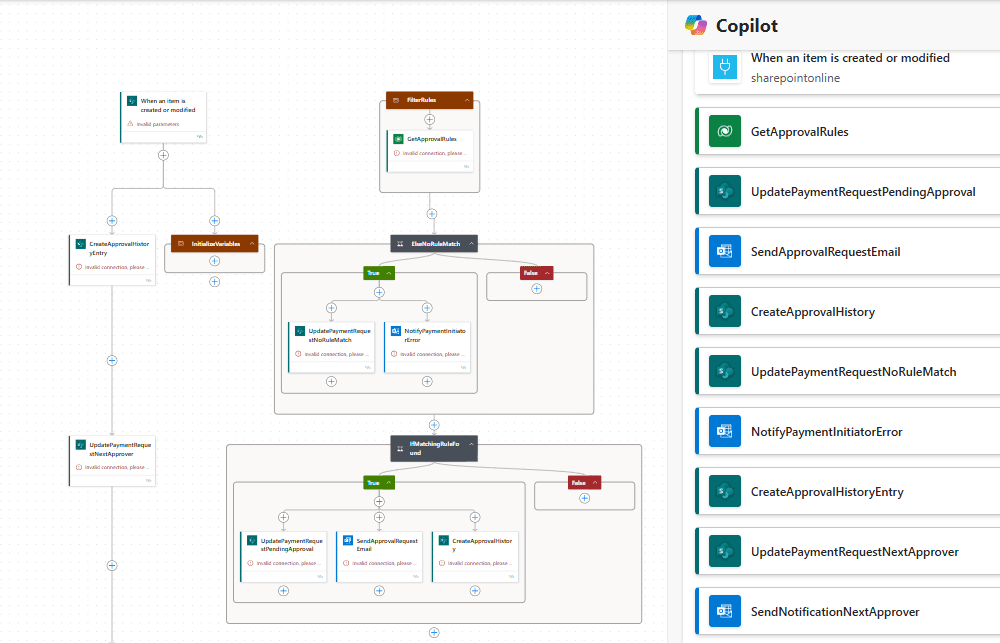
Flow Logic – you can paste it directly in the Power Automate Copilot to generate the flow:
- When a new item is created in Payment Requests list
- Initialize variables for approval levels needed
- Get approval rules matching Entity, Payment Type, Currency
- Filter rules where Amount is between Min and Max Amount
- If matching rule found:
- Set approval levels based on rule
- Update Payment Request with first approver and “Pending Approval” status
- Send approval request email with link to Power App
- Create Approval History entry with “Pending” status
- Else:
- Update Payment Request with “No Rule Match” status
- Notify payment initiator of error
2.3.2 Create the “Process Approval Decision” Flow
- Create a flow triggered when an approval decision is submitted
- Add logic to:
- Record decision in Approval History
- If approved:
- Check if more approvals needed
- If yes, route to next approver
- If no, mark as fully approved
- If rejected:
- Update status to rejected
- Notify initiator
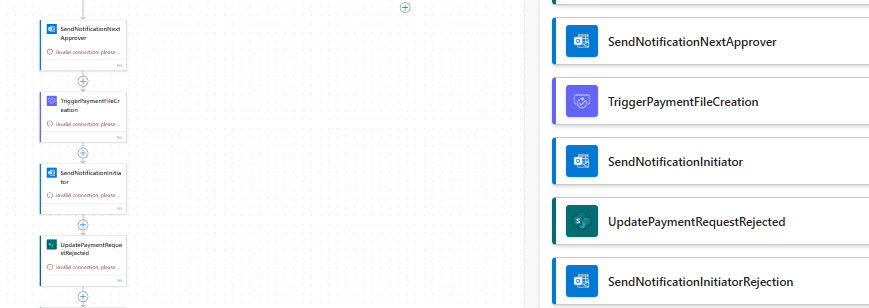
Flow Logic – you can paste it directly in the Power Automate Copilot to generate the flow:
- When approval decision is submitted
- Create entry in Approval History with decision details
- If decision = “Approved”:
- Check current approval level against required levels
- If more approvals needed:
- Determine next approver from rules
- Update Payment Request with next approver
- Send notification to next approver
- Else:
- Update Payment Request status to “Fully Approved”
- Trigger payment file creation flow
- Send notification to initiator
- If decision = “Rejected”:
- Update Payment Request status to “Rejected”
- Send notification to initiator with rejection reason
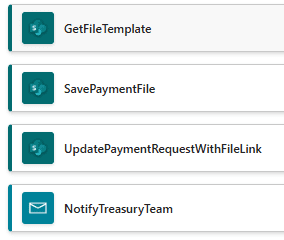
2.3.3 Create the “Generate Payment File” Flow
- Create a flow triggered when payment status changes to “Fully Approved”
- Add steps to:
- Group approved payments by bank and payment type
- For each group:
- Get appropriate file template
- Generate payment file in required format
- Store in SharePoint
- Update payment requests with file link
- Send notification to treasury team
Flow Logic – you can paste it directly in the Power Automate Copilot to generate the flow:
- When Payment Request status changes to “Fully Approved”
- Group payments by Bank Account and Payment Type
- For each group:
- Get appropriate file template from Payment Templates library
- Generate payment file in required format (CSV, XML, etc.)
- Save file to SharePoint with naming convention: “[BankName][PaymentType][Date]_[Time].csv”
- Update Payment Requests with link to generated file
- Send notification to treasury team with file links
2.3.4 Create the “Payment Reminder” Flow
- Create a scheduled flow that runs daily
- Add steps to:
- Find payment requests pending approval for >24 hours
- Send reminder to current approvers
- Escalate if pending >48 hours
2.4 Building the Approver Experience
Now let’s create an intuitive approval experience for approvers.
2.4.1 Approval Notification Emails
Configure rich HTML emails containing:
- Payment details summary
- “Approve” and “Reject” buttons linking to approval form
- Link to full details in Power App
2.4.2 Mobile Approval Form
Create a responsive approval form using Power Apps that:
- Shows payment details
- Provides approve/reject buttons
- Captures comments
- Works on mobile devices
2.4.3 Delegation Feature
Add ability for approvers to:
- Temporarily delegate approval authority
- Specify delegation timeframe
- Select delegate from approved list
2.5 Creating the Payment File Generation System
Now we’ll set up the system to create bank-ready payment files.
2.5.1 Bank File Templates
For each bank and payment type, create a template file that:
- Follows the bank’s required format (CSV, XML, MT101, etc.)
- Contains all required fields
- Uses placeholder text for dynamic content
2.5.2 File Generation Logic
In the “Generate Payment File” flow:
- Select correct template based on bank and payment type
- Replace placeholders with actual payment data
- Format numbers and dates according to bank requirements
- Add header/footer information as needed
- Save to SharePoint with appropriate naming
2.5.3 File Security
Implement security measures:
- Encrypt sensitive payment files
- Implement download tracking
- Restrict access to authorized users
2.6 Building the Reporting Dashboard
Finally, let’s create a Power BI dashboard for reporting and visibility.
2.6.1 Connect Power BI to SharePoint Lists
- In Power BI Desktop, connect to:
- Payment Requests list
- Approval History list
2.6.2 Create Key Visualizations
Design reports showing:
- Payment volume by type, entity, and currency
- Approval turnaround time
- Bottleneck identification
- Rejection analysis
- Upcoming payment forecast
2.6.3 Publish Dashboard
Share the dashboard with:
- Treasury team
- Finance leadership
- Approvers (with appropriate filtering)
Part 3: Testing and Optimization
3.1 Testing Your Treasury Bot
3.1.1 Functional Testing Checklist
Test each component of your Treasury Bot:
- Payment data capture (manual entry)
- Payment data import (Excel)
- Approval rule matching
- Approval routing logic
- Notification delivery
- Approval submission
- Multi-level approval workflows
- Payment file generation
- Dashboard reporting
3.1.2 Scenario Testing
Test these complex scenarios:
Scenario 1: Multi-entity, multi-currency batch approval
- Import 20+ payments across 3 entities in 2 currencies
- Verify correct routing to appropriate approvers
- Test batch approval functionality
- Confirm correct file generation by entity and currency
Scenario 2: Approval delegation during approver absence
- Set up delegation for a primary approver
- Submit payment requiring their approval
- Verify notification to delegate
- Test approval by delegate
- Confirm proper audit trail recording
Scenario 3: Payment rejection and resubmission
- Submit payment for approval
- Have approver reject with comments
- Modify payment based on comments
- Resubmit payment
- Verify fresh approval cycle
Scenario 4: Rule exception handling
- Submit payment outside predefined rules
- Test exception handling process
- Verify management override capability
3.1.3 User Acceptance Testing
Involve actual users in testing:
- Select treasury team members and approvers
- Assign specific test scenarios
- Collect feedback using structured forms
- Document issues and enhancement requests
3.2 Common Issues and Solutions

3.3 Optimization Strategies
3.3.1 Performance Optimization
- Implement indexing on SharePoint lists
- Schedule automated archiving of completed payments
- Optimize Power Automate flows with fewer actions
- Use batch processing for large payment sets
3.3.2 User Experience Improvements
- Add one-click approval for mobile
- Create personalized dashboards for different user types
- Implement notification preferences
- Add natural language search capability
3.3.3 Process Efficiency
- Analyze approval bottlenecks
- Implement SLA monitoring and escalation
- Add pre-approved payment templates
- Create recurring payment functionality
3.4 Scaling Your Treasury Bot
As your payment volumes grow:
- Add Capacity:
- Increase SharePoint list thresholds
- Implement multi-stage archiving
- Expand Functionality:
- Add receipt matching
- Implement payment forecasting
- Create subsidiary-specific workflows
- Add multi-language support
- Enhance Security:
- Implement multi-factor authentication for approvals
- Add IP restriction for sensitive actions
- Create approval anomaly detection
3.5 Maintenance Plan
Establish an ongoing maintenance routine:
- Weekly tasks:
- Monitor error logs
- Check for stalled workflows
- Review approval SLAs
- Monthly tasks:
- Update approver lists
- Review and refine approval rules
- Archive completed payments
- Quarterly tasks:
- Review bank file format changes
- Update dashboards and reports
- Implement enhancements based on user feedback
Conclusion
You’ve now successfully built a Treasury Bot for Payment Approval Automation without writing code or involving IT. This solution:
- Eliminates manual data handling
- Enforces proper approval controls
- Provides complete visibility into payment status
- Creates a robust audit trail
- Generates bank-ready payment files
The entire flow should look like this:
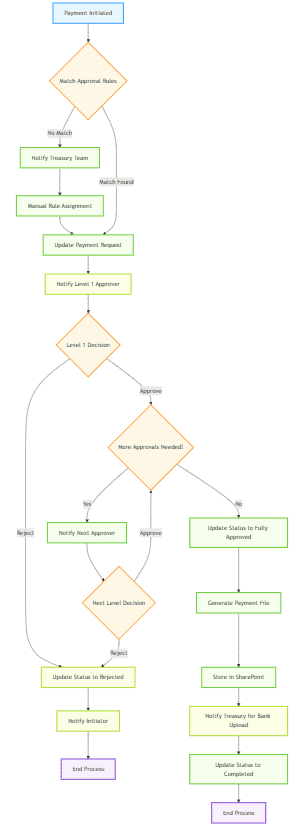
The above flowchart schema is below, copy paste is in Mermaid Editor to create your own diagram:
flowchart TD
    A[Payment Initiated] --> B{Match Approval Rules}
    B -->|No Match| C[Notify Treasury Team]
    C --> D[Manual Rule Assignment]
    D --> E[Update Payment Request]
    B -->|Match Found| E
    E --> F[Notify Level 1 Approver]
    F --> G{Level 1 Decision}
    G -->|Reject| H[Update Status to Rejected]
    H --> I[Notify Initiator]
    I --> J[End Process]
    G -->|Approve| K{More Approvals Needed?}
    K -->|Yes| L[Notify Next Approver]
    L --> M{Next Level Decision}
    M -->|Reject| H
    M -->|Approve| K
    K -->|No| N[Update Status to Fully Approved]
    N --> O[Generate Payment File]
    O --> P[Store in SharePoint]
    P --> Q[Notify Treasury for Bank Upload]
    Q --> R[Update Status to Completed]
    R --> S[End Process]
By leveraging the power of Microsoft’s business automation tools, you’ve transformed a manual, error-prone process into an efficient, controlled system that scales with your organization’s needs.
Remember to continually refine your Treasury Bot based on user feedback and evolving treasury requirements. The modular design allows you to expand functionality as your needs grow, potentially integrating with additional systems as they become available.
Disclaimer
This article provides a technical framework and demonstrates how to leverage existing tools to streamline treasury processes. The implementation described here assumes:
- Appropriate governance frameworks are already in place within your organization.
- Human oversight remains essential at critical approval points as detailed in the workflow.
- Organization-specific controls must be integrated based on your company’s policies and risk tolerance.
This guide focuses exclusively on the technical implementation aspects rather than governance, compliance, or accountability frameworks, which will vary by organization/ country/ region. Always consult with your compliance, security, finance, and legal teams to ensure the solution meets your organization’s specific requirements and standards before implementation.
Any automation solution should enhance—not replace—human judgment in financial processes. I don’t suggest full automation of processes, but rather the streamlining of workflows while maintaining appropriate controls.


Leave a Comment
You must be logged in to post a comment.