A Step-by-Step Implementation Guide Following the Treasury API Manual
Introduction
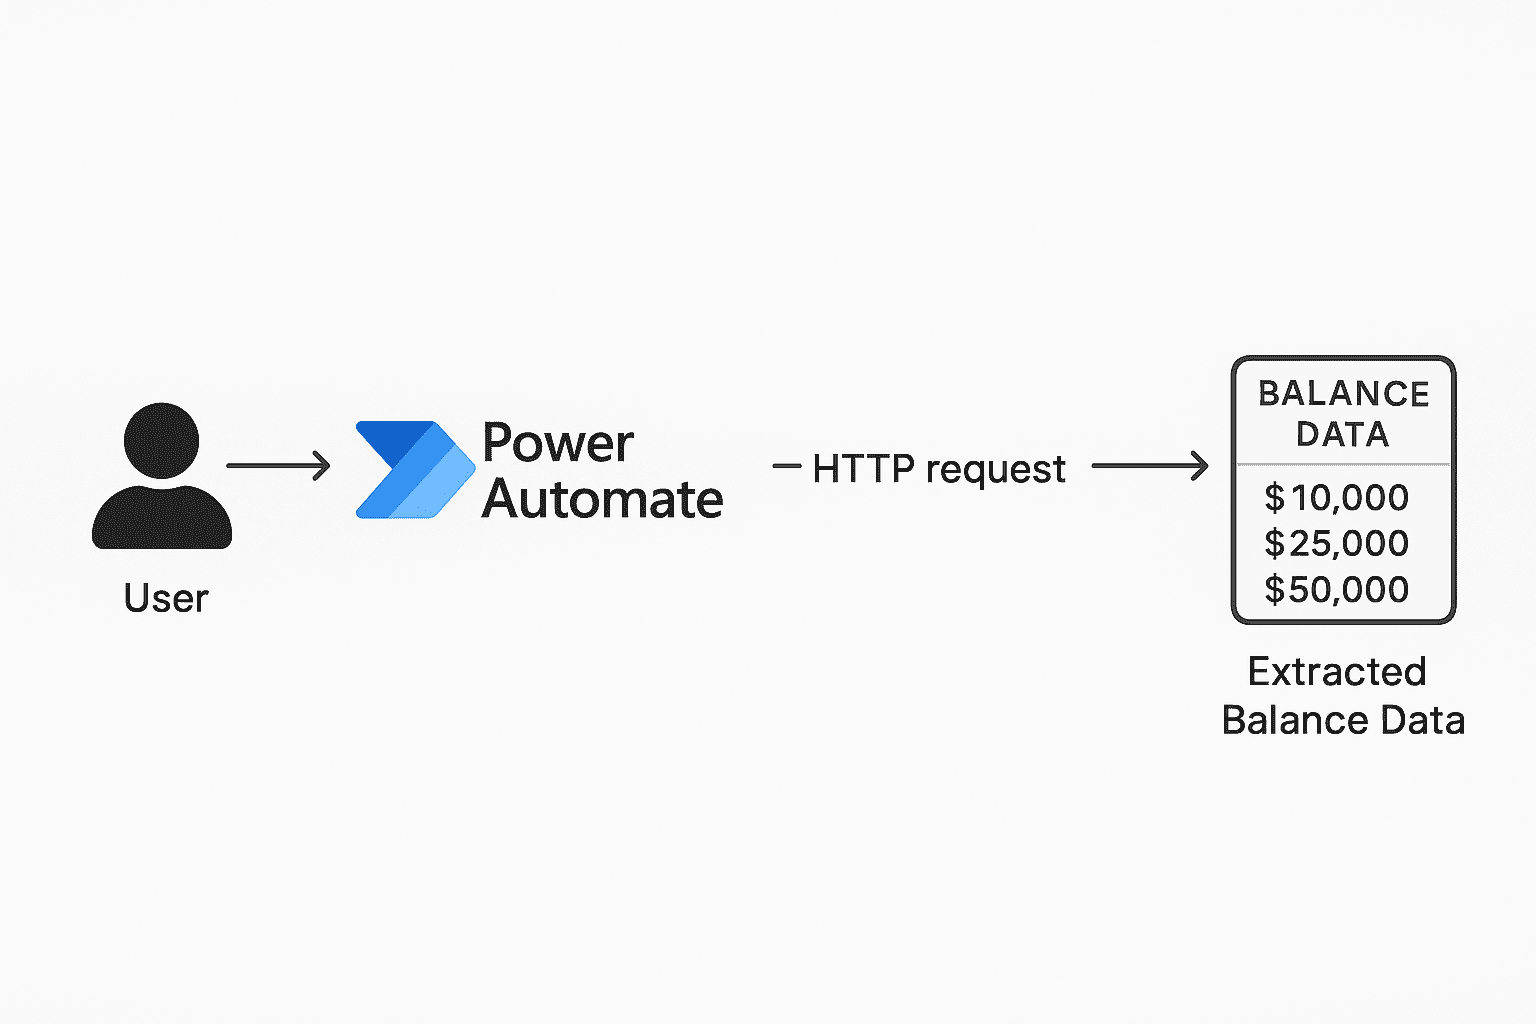
This practical guide demonstrates how to implement the concepts from our Treasury API Guide: A Non-Technical Treasurer’s Complete Manual using a real-world example. We’ll build a Power Automate flow that automatically extracts account balances from Kyriba TMS and populates an Excel Online file – no coding required.
What You’ll Accomplish:
- Create your first automated API integration
- Extract live balance data from Kyriba TMS
- Automatically update Excel with fresh treasury data
- Set up scheduled daily runs for cash positioning
Prerequisites:
- Microsoft 365 subscription with Power Automate
- Kyriba TMS access with API credentials
- Basic familiarity with concepts from the Treasury API Guide
Why This Integration Matters
Manual balance extraction is one of the most time-consuming daily treasury tasks. This automation transforms a 30-minute manual process into a 2-minute automated workflow that runs while you focus on analysis and decision-making.
Business Benefits:
- Time Savings: Reduce daily cash positioning from 30 minutes to 2 minutes
- Accuracy: Eliminate manual transcription errors
- Consistency: Same format every day, regardless of who’s working
- Real-time Data: Fresh balances whenever you need them
- Audit Trail: Complete log of all data retrievals
Step-by-Step Implementation Guide
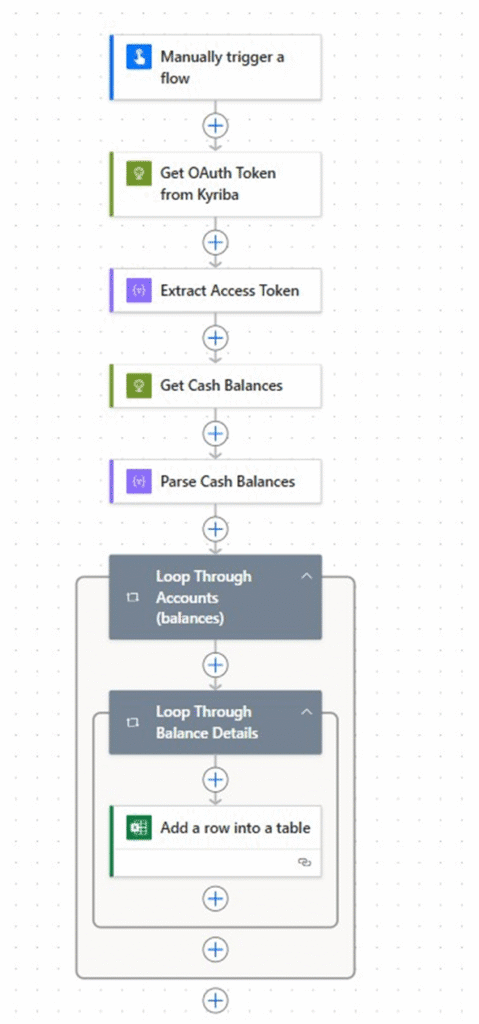
Step 1: Create Your Power Automate Flow Foundation
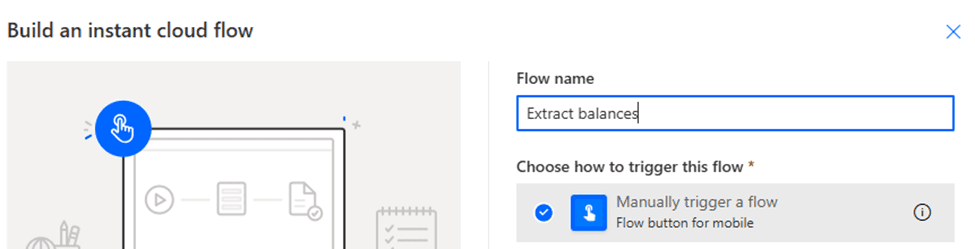
What We’re Doing: Setting up the basic structure for our automated workflow.
Action Steps:
- Navigate to Power Automate (flow.microsoft.com)
- Click “Create” from the left navigation
- Select “Scheduled cloud flow”
- Name your flow: “Daily Kyriba Balance Extract”
- Set schedule: Manual Trigger or Daily at 8:00 AM (or your preferred time)
- Click “Create”
Treasury Context: This creates the foundation that will run automatically every business day, ensuring your cash position data is ready when you arrive at the office.
Step 2: Configure Kyriba API Connection
What We’re Doing: Establishing the secure connection to your Kyriba TMS using the authentication principles from our API guide.
Action Steps:
- Click “+ New step”
- Search for “HTTP” connector
- Select “HTTP – HTTP” action
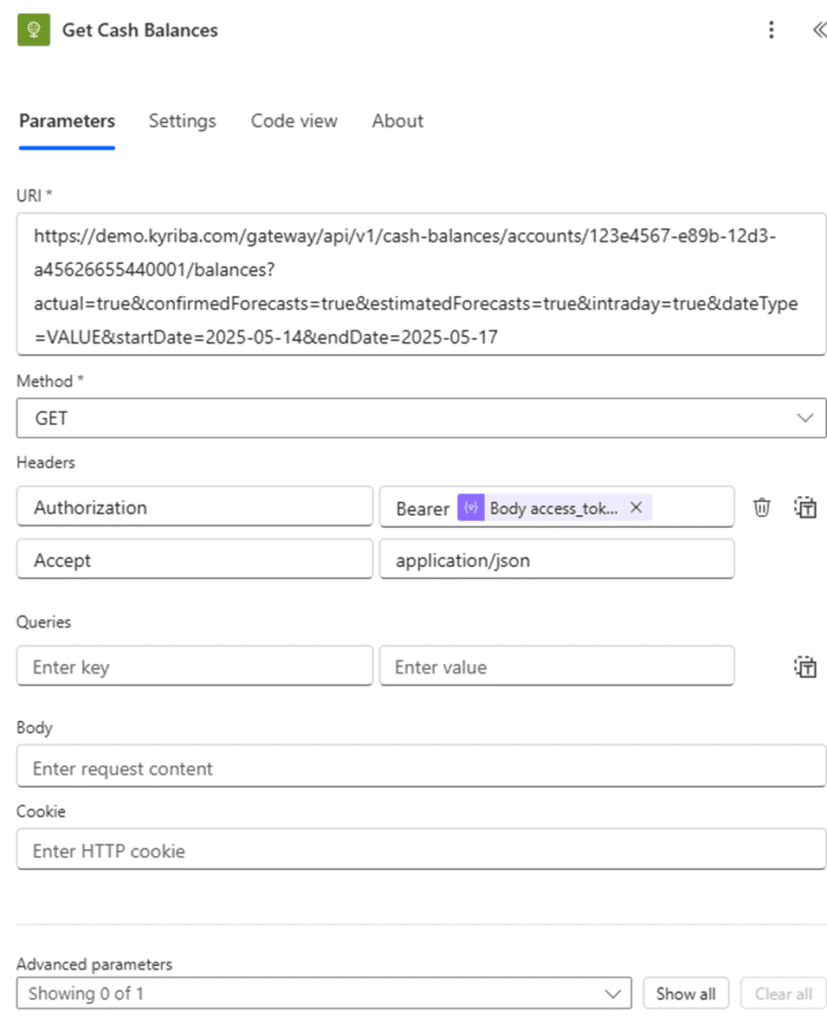
- Configure the request:
- Method:
GET - URI:
https://[your-kyriba-instance].kyriba.com/api/v1/accounts/balances - Headers: Add the following headers:
Authorization: Bearer [your-api-token]Content-Type: application/jsonAccept: application/json
- Method:
Key Points:
- Replace
[your-kyriba-instance]with your actual Kyriba domain - Your Bearer Token comes from Kyriba’s API credentials (see Step 3)
- This follows the exact authentication pattern explained in our main API guide
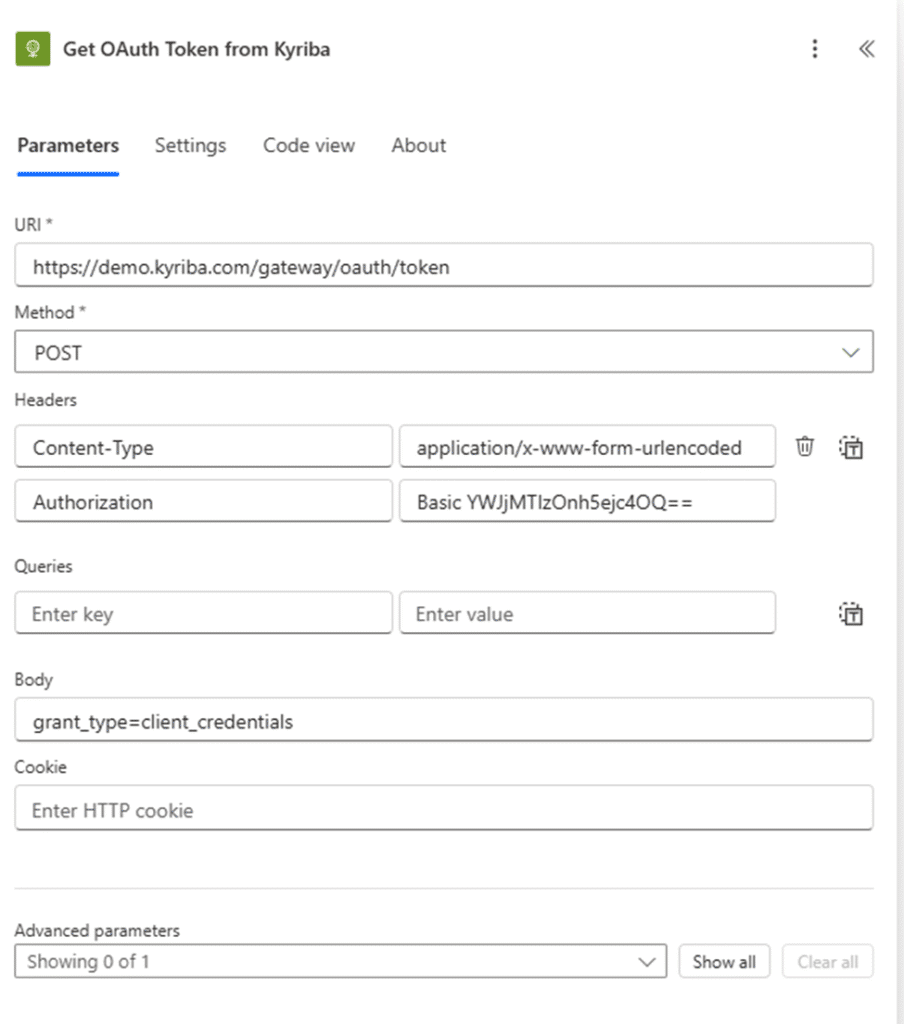
Step 3: Handle Kyriba Authentication
What We’re Doing: Implementing the Bearer Token authentication we covered in the Treasury API Guide.
Before This Step:
- Contact your Kyriba administrator for API credentials
- Obtain your:
- Client ID
- Client Secret
- API Base URL
- Token endpoint
Authentication Flow Configuration:
- Add another HTTP action before the balance request
- Configure for token retrieval:
- Method:
POST - URI:
https://[your-kyriba-instance].kyriba.com/api/oauth/token - Headers:
Content-Type: application/x-www-form-urlencoded - Body:
grant_type=client_credentials&client_id=[your-client-id]&client_secret=[your-client-secret]
- Method:
Security Note: Store credentials in Power Automate’s secure connection settings, never hardcode them in the flow.
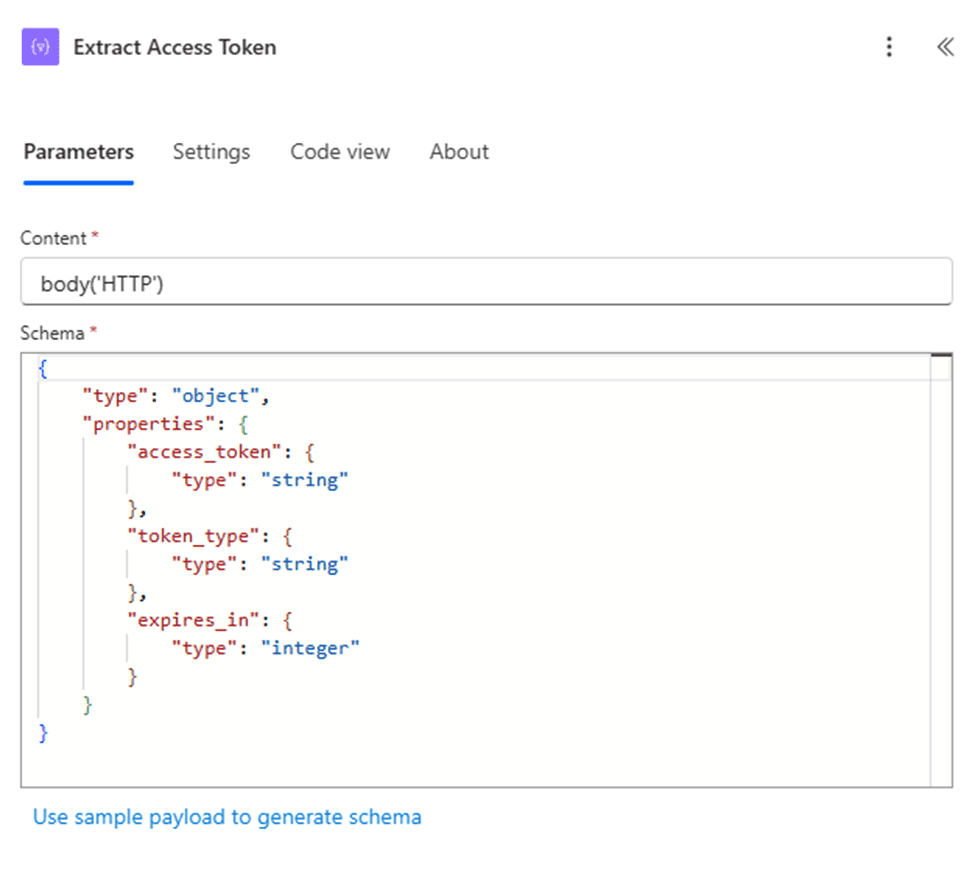
Step 4: Parse the Kyriba Response
What We’re Doing: Converting the JSON response from Kyriba into usable data, applying the response handling techniques from our API guide.
Action Steps:
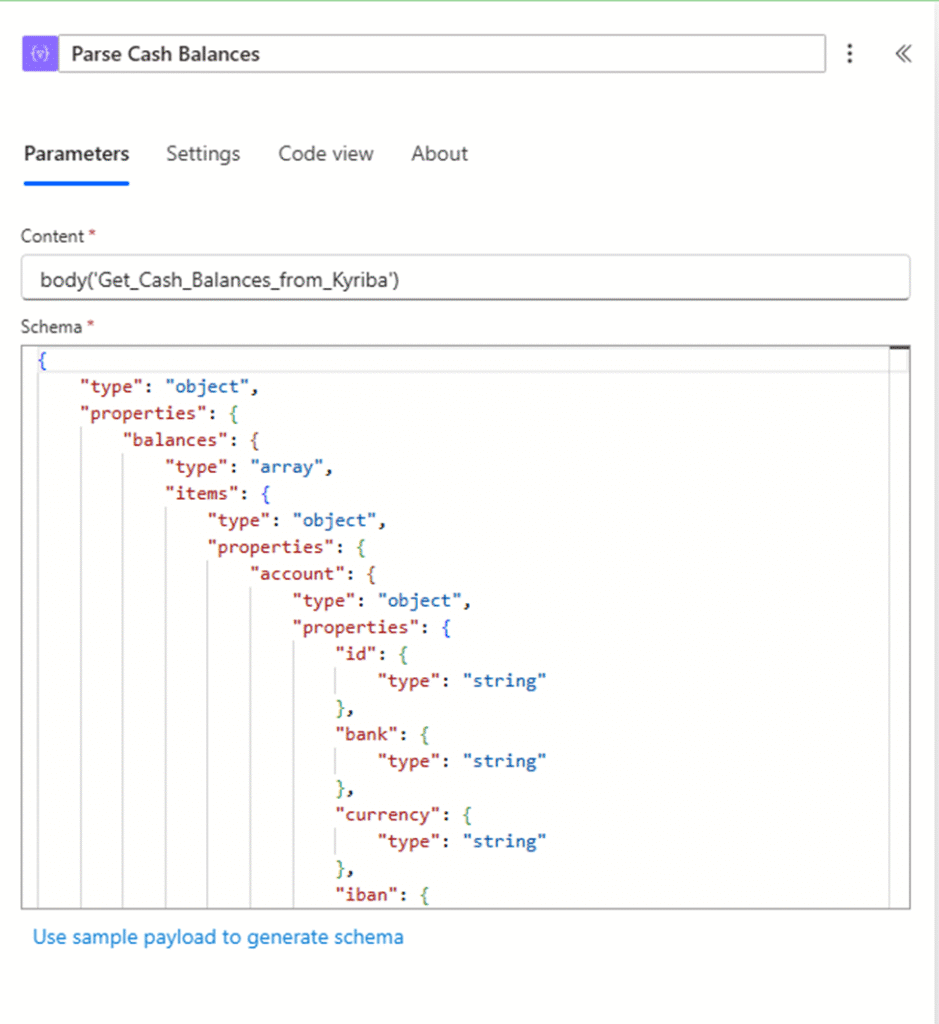
- Add “Parse JSON” action
- Content: Select the
bodyfrom your HTTP response - Schema: Use this sample schema based on typical Kyriba responses:
{
    "type": "object",
    "properties": {
        "accounts": {
            "type": "array",
            "items": {
                "type": "object",
                "properties": {
                    "accountNumber": {"type": "string"},
                    "accountName": {"type": "string"},
                    "currency": {"type": "string"},
                    "availableBalance": {"type": "number"},
                    "ledgerBalance": {"type": "number"},
                    "asOfDate": {"type": "string"}
                }
            }
        }
    }
}
Why This Matters: This step transforms the raw API response into structured data that Excel can understand, eliminating the manual interpretation step.
Step 5: Set Up Excel Online Integration
What We’re Doing: Creating the destination for our automated balance data.
Excel Preparation:
- Create a new Excel file in OneDrive/SharePoint
- Name it: “Daily Cash Position – [Current Year]”
- Create headers in Row 1:
- A1: Account Number
- B1: Account Name
- C1: Currency
- D1: Available Balance
- E1: Ledger Balance
- F1: As of Date
- G1: Last Updated
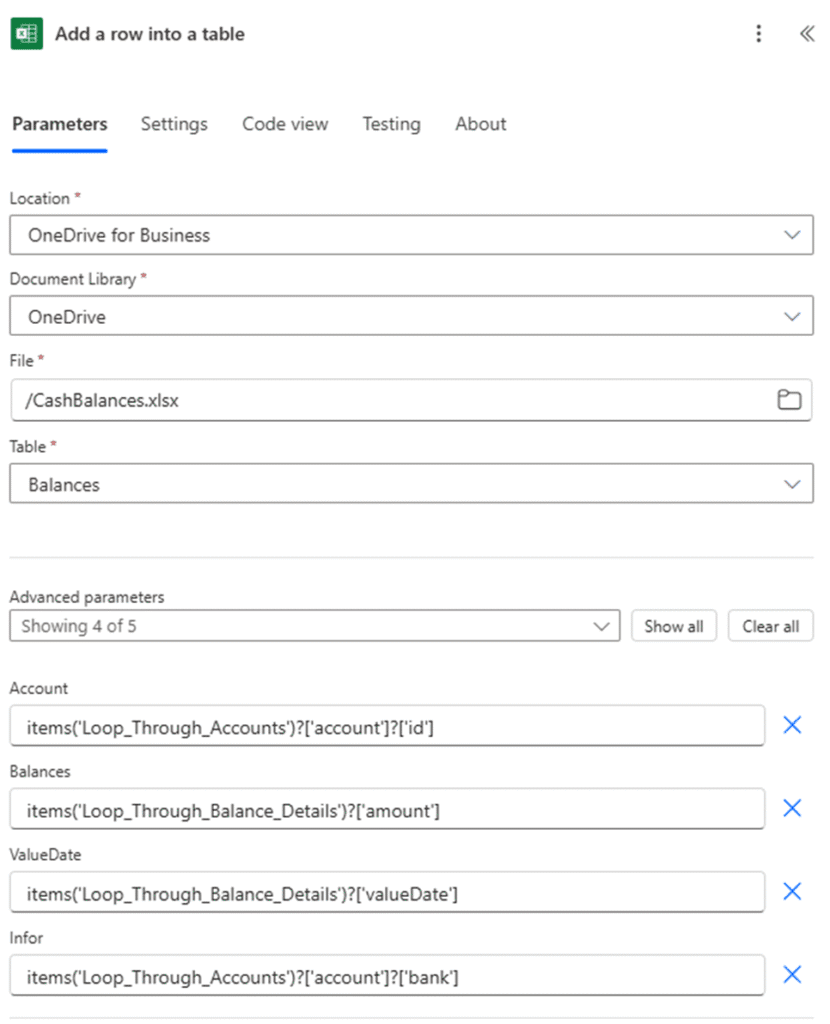
Power Automate Configuration:
- Add “Excel Online (Business)” action
- Select “Add a row into a table”
- Choose your Excel file and create/select a table
- Map the Kyriba data fields to Excel columns
Step 6: Add Data Transformation Logic
What We’re Doing: Handling multiple accounts and formatting data for treasury use.
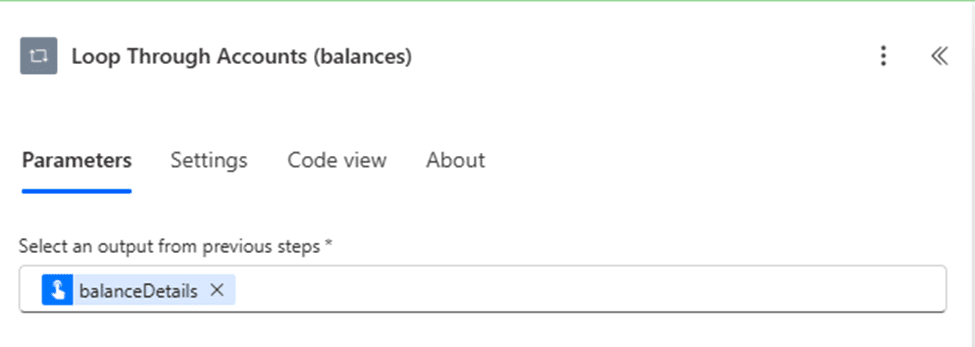
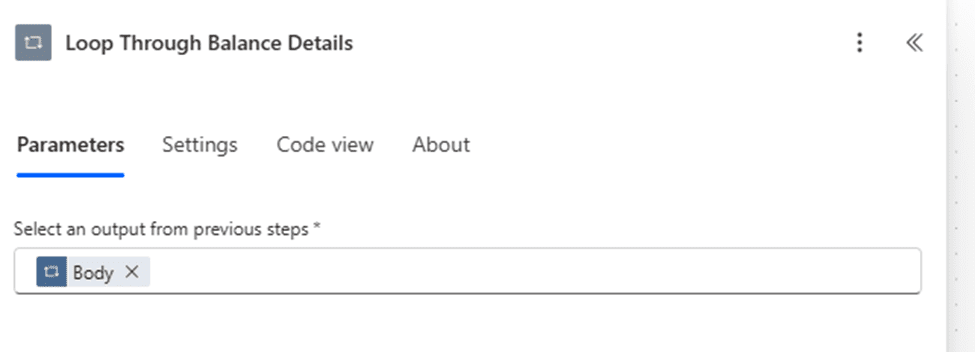
Action Steps:
- Add “Apply to each” control
- Select the
accountsarray from your parsed JSON - Inside the loop, add “Add a row into a table” action
- Map each field:
- Account Number:
items('Apply_to_each')?['accountNumber'] - Account Name:
items('Apply_to_each')?['accountName'] - Currency:
items('Apply_to_each')?['currency'] - Available Balance:
items('Apply_to_each')?['availableBalance'] - Ledger Balance:
items('Apply_to_each')?['ledgerBalance'] - As of Date:
items('Apply_to_each')?['asOfDate'] - Last Updated:
utcNow()
- Account Number:
Treasury Value: This ensures every account balance is captured systematically, with timestamps for audit purposes.
Step 7: Implement Error Handling
What We’re Doing: Adding the error handling practices recommended in our API troubleshooting checklist.
Action Steps:
- Go to Settings for each HTTP action
- Enable “Configure run after”
- Select both “is successful” and “has failed”
- Add “Condition” control after HTTP actions
- If yes: Continue with data processing
- If no: Add email notification action
Error Notification Setup:
- Add “Send an email (V2)” action in the “No” branch
- Configure:
- To: Your email and treasury team
- Subject: “Kyriba API Integration Failed – [Date]”
- Body: Include error details and status codes
Why This Matters: Following our API guide’s emphasis on monitoring, you’ll know immediately when something breaks instead of discovering missing data later.
Step 8: Test and Validate Your Integration
What We’re Doing: Following the testing methodology from our Treasury API Guide before going live.
Testing Checklist:
- Manual Test Run:
- Click “Test” in Power Automate
- Select “I’ll perform the trigger action”
- Review each step’s output
- Verify Excel receives correct data
- Data Validation:
- Compare API results with Kyriba interface
- Check all accounts are included
- Verify balance accuracy
- Confirm date/time stamps
- Error Scenario Testing:
- Temporarily use wrong credentials (test 401 error handling)
- Use invalid endpoint (test 404 handling)
- Verify error notifications work
- Schedule Validation:
- Confirm trigger timing
- Test timezone settings
- Verify weekend/holiday handling
Advanced Configuration Options
Multi-Currency Formatting
Add currency formatting logic to display balances in treasury-standard format:
concat(items('Apply_to_each')?['currency'], ' ', formatNumber(items('Apply_to_each')?['availableBalance'], 'N2'))
Historical Data Retention
Modify the flow to append data instead of overwriting:
- Add date-based sheet creation
- Implement monthly archiving
- Create summary pivot tables
Alert Thresholds
Add conditional logic for balance alerts:
- Low balance warnings
- Large variance notifications
- Missing account alerts
Troubleshooting Common Issues
Authentication Problems
Symptom: 401 Unauthorized errors Solution:
- Verify API credentials with Kyriba admin
- Check token expiration settings
- Confirm endpoint URLs
Data Mapping Errors
Symptom: Empty Excel cells or wrong data Solution:
- Review JSON schema accuracy
- Check field name spellings
- Validate data types match
Schedule Issues
Symptom: Flow doesn’t run at expected times Solution:
- Verify timezone settings
- Check trigger configuration
- Review Power Automate plan limits
Monitoring and Maintenance
Daily Monitoring
- Review run history in Power Automate
- Check Excel file for data completeness
- Monitor error notification emails
Weekly Maintenance
- Verify API credential expiration dates
- Review data accuracy trends
- Update any changed account structures
Monthly Review
- Analyze automation time savings
- Review error patterns
- Consider additional automations
Expanding Your Treasury API Journey
This Kyriba integration demonstrates the practical application of concepts from our Treasury API Guide: A Non-Technical Treasurer’s Complete Manual. Having successfully implemented your first API automation, consider these next steps:
Immediate Opportunities
- Payment Status Tracking: Automate payment confirmation workflows
- FX Rate Integration: Live currency rates for hedging decisions
- Multi-Bank Consolidation: Combine data from multiple banking APIs
Advanced Integrations
- Risk Management: Automated VaR calculations with live market data
- Compliance Reporting: Automated regulatory report generation
- Cash Forecasting: Integration with ERP systems for predictive analytics
Building Treasury API Capabilities
- Start Small: Master this balance extraction before adding complexity
- Document Everything: Create your own API integration playbook
- Train Your Team: Share knowledge and build organizational capability
- Iterate Gradually: Add features based on actual business needs
Conclusion
You’ve successfully built your first treasury API integration, transforming manual balance extraction into an automated, reliable process. This practical implementation demonstrates that APIs aren’t just for IT departments – they’re powerful tools that treasury professionals can leverage directly.
Key Achievements: ✅ Automated daily balance extraction from Kyriba
✅ Eliminated manual data entry errors
✅ Created audit trail for all data retrievals
✅ Established foundation for additional treasury automations
✅ Applied real-world API concepts from our comprehensive guide
Time Investment vs. Returns:
- Setup Time: 2-3 hours (one-time)
- Daily Time Saved: 25-30 minutes
- Monthly ROI: 10+ hours of treasury analyst time
- Accuracy Improvement: Elimination of transcription errors
This integration serves as your foundation for building a more automated, efficient treasury operation. As you become comfortable with these API concepts, you’ll identify numerous opportunities to apply similar automation throughout your treasury processes.
Remember: every manual, repetitive task in treasury is a candidate for API automation. Start with high-impact, low-complexity processes like this balance extraction, then gradually expand your automation portfolio.
Next Steps:
- Implement this Kyriba integration in your environment
- Monitor and refine the process for 30 days
- Identify your next automation opportunity
- Apply the same methodology to additional treasury workflows
- Share your success with the treasury community
Resources:
- Original Treasury API Guide: A Non-Technical Treasurer’s Complete Manual for foundational concepts
- Kyriba API documentation found here: JSON schema, Kyriba API Postman Collection, etc.
- Power Automate community for troubleshooting and inspiration
- Treasury technology forums for peer learning and best practices
Disclaimer: This guide is based on publicly available Kyriba API documentation and general Power Automate capabilities. I am not affiliated with, promoting, or selling Kyriba products. Always consult with your Kyriba administrator and IT security team before implementing API integrations in production environments.


Leave a Comment
You must be logged in to post a comment.