Introduction
Cash pooling is an essential Treasury function, ensuring liquidity optimization and efficient fund utilization.
Typically, a cash pool is managed by a bank, allowing companies to centralize liquidity management across multiple accounts. However, not all companies have access to a bank-managed cash pool, nor do they have a Treasury Management System (TMS) to handle self-managed cash pooling. In such cases, Treasury teams often resort to manually tracking all accounts, which is inefficient and prone to errors.
The solution? A Treasury Bot that automates cash pooling tasks—without requiring IT involvement or coding skills.
In this article, I’ll show you step-by-step on how to build a Treasury Bot for cash pooling automation using Microsoft Power Automate, Excel, and Outlook.
Step 1: Define the Scope of the Treasury Bot
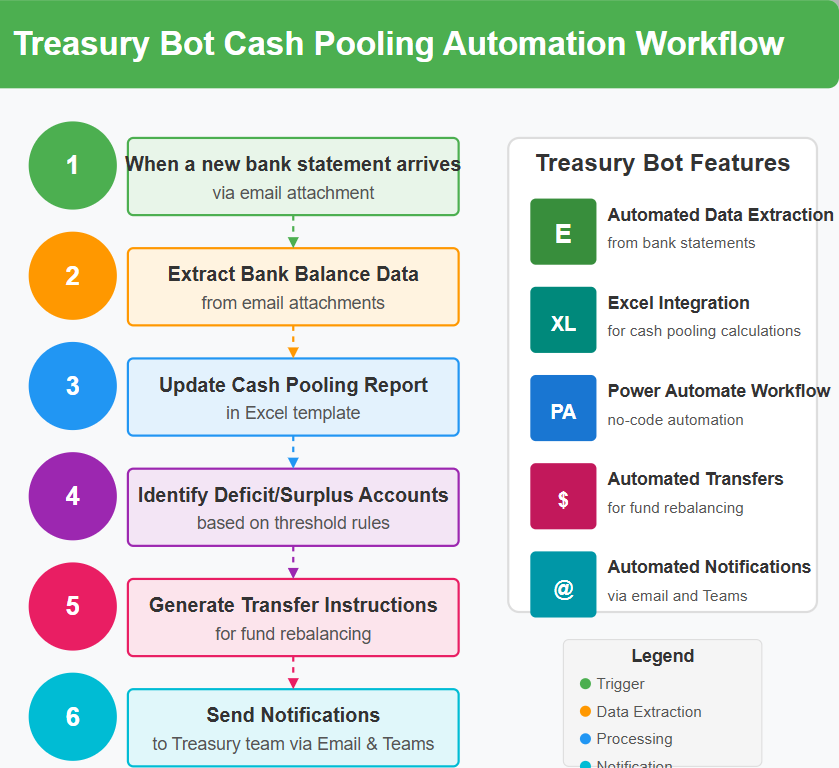
The Treasury Bot will automate the following:
- Extracting bank balances from daily bank statements (e.g: email attachments)
- Consolidating balances into a cash pooling report
- Identifying deficit and surplus accounts
- Sending automated transfer instructions to rebalance funds
- Notifying Treasury teams with daily reports
Step 2: Gather the Necessary Tools
You need:
- Microsoft Power Automate (for automation workflows)
- Microsoft Outlook (to receive bank statements and send notifications)
- Microsoft Excel (to consolidate cash balances and automate calculations)
- OneDrive or SharePoint (for storing the cash pooling report)
- Microsoft Teams
Step 3: Automate Bank Statement Processing
- Create a Power Automate Flow to Read Bank Statements:
- Go to Power Automate → Create a new automated cloud flow.
- Select When a new email arrives (Outlook trigger).
- Add a condition: If the email contains an attachment with a bank statement (.xls, .csv, .pdf).
- Save the attachment to OneDrive/SharePoint.
- Extract Data from the Bank Statement:
- Use Power Automate’s “Run a script” action in Excel to extract balances.
- Store the extracted data in a structured table format.
Step 4: Automate Cash Pooling Calculation
- Prepare an Excel Template:
- Create columns for Entity, Bank Account, Opening Balance, Incoming Funds, Outgoing Payments, Net Balance, etc.
- Use Excel formulas or Power Query to aggregate balances and identify deficits/surpluses.
- Power Automate: Update the Cash Pooling Report Automatically:
- Create a Power Automate flow to update the Excel file when a new statement is processed.
- Set a scheduled trigger to run every morning.
- Use Excel’s formulas to calculate cash pooling movements.
Step 5: Automate Transfer Instructions
- Set Threshold Rules for Fund Rebalancing:
- Define thresholds (e.g., accounts below €100,000 require funding, accounts above €1M should be swept).
- Use an Excel formula or Power Automate Condition logic to determine required fund transfers.
- Generate Transfer Instructions Automatically:
- Create an Excel template with standardized SWIFT/SEPA transfer instructions.
- Use Power Automate to populate the template with real-time cash pooling balances.
- Save the instructions in OneDrive/SharePoint.
- Notify team on Microsoft Team the payment file is ready.
Step 6: Automate Notifications to the Treasury Team
- Set Up Email Alerts:
- Use Power Automate to send an email summary of the cash pool balances and fund transfers.
- Attach the updated Excel report to the email.
- Send a daily notification to the Treasury team and approvers.
- Use Microsoft Teams for Alerts:
- Configure Power Automate to post real-time cash pooling updates in a Treasury Teams channel.
Step 7: Testing and Deployment
- Run the Treasury Bot manually for the first week and validate results.
- Adjust Power Automate conditions based on feedback.
- Once validated, schedule the bot to run automatically every morning.
Step 8: Handling Exceptions and Errors
Even with automation, there can be occasional errors or exceptions, such as missing attachments, corrupted files, or unexpected data formats. Here’s how to handle them:
- Create Error Notifications: Set up Power Automate to send error notifications to the Treasury team if a flow fails.
- Implement Logging: Maintain a log of all automated activities, including successful runs and errors, for easy troubleshooting.
- Fallback Procedures: Outline manual fallback procedures in case of prolonged automation downtime.
Step 9: Enhancing Security
When dealing with financial data, security is paramount. To ensure the Treasury Bot operates securely:
- Data Encryption: Ensure all data in transit and at rest is encrypted.
- Access Controls: Implement strict access controls and permissions in Power Automate, OneDrive/SharePoint, and Excel.
- Regular Audits: Schedule regular security audits to identify and address potential vulnerabilities.
Step 10: Continuous Improvement
Automation is not a one-time setup; it requires continuous monitoring and improvement:
- Monitor Performance: Regularly monitor the bot’s performance and review the logs for any issues or inefficiencies.
- User Feedback: Collect feedback from the Treasury team to identify areas for improvement.
- Update Processes: As business needs evolve, update the bot’s processes and thresholds to remain effective and relevant.
Additional Tips
- Utilize AI Capabilities: Leverage AI capabilities within Power Automate (AI Builder) for predictive analytics and forecasting cash flow requirements.
- Training and Support: Provide training sessions for the Treasury team to ensure they are comfortable using the automated system and troubleshooting basic issues.
- Scalability: Design the bot with scalability in mind so it can handle increased transaction volumes as the organization grows.
With this no-code Treasury Bot, cash pooling automation is now within reach—without IT dependency. By leveraging Power Automate, Excel, and Outlook, Treasury teams can streamline daily cash management, reduce errors, and ensure liquidity optimization effortlessly.


Leave a Comment
You must be logged in to post a comment.